N.B. # 1 The order of these activities is NOT the most time-effective. We planned it in this fashion since we wanted to cut costs by flying in and out of Buenos Aires (and visit my cousin who lives there). If you want to save on time, fly to Punta Arenas in Chile and start with the Torres del Paine trek then hit El Calafate then El Chaltén then Buenos Aires (and ignore the bit I wrote about figuring out the bus from El Calafate to Torres del Paine).
N.B. #2 We were cost/time limited, but there are so many other things to see in Argentina! Iguazu Falls (beautiful waterfall), Mendoza (amazing Malbec), more hiking (the “O” route instead of the “W” in Torres del Paine), the list goes on… but we got the heavy hitters and wouldn’t have planned it any other way with the time we had.
You can download and easily print this guide here.
Day 1: Arrive in EL Calafate
Settle into your hostel/campground. We recommend the following budget-friendly options:
Linda Vista: centrally located larger apartment with kitchen
Sign up for the following excursions at your hostel:
Perito Moreno (through Hielos y Aventura - the only guide that treks the glacier) for the following day, two options:
Big Ice: Hike along the balcony across from the glacier, boat over to the glacier, and trek on the glacier for 3.5 hours [ARS $4,000]
Minitrek: Hike along the balcony across from the glacier, boat over to the glacier, and trek on the glacier for 1.5 hours [ARS $2,400] - We did this one; 1.5 hours was plenty! Since it started sleeting icy rain, we were freezing towards the end.
A shuttle picks you up from your hostel for both of the above mentioned tours.
Bus ticket to Torres del Paine (through Always Glaciers or Experience Chile)
The Always Glaciers website is notoriously always down, but we were able to book tickets at America del Sur Hostel. The information on the hostel’s website is also misleading because it indicates you can avoid a stop in Puerto Natales - which was NOT true when we took it. The bus will drop you off at the Puerto Natales bus station, from where you will need buy another ticket to Laguna Amarga (the ranger station in Torres del Paine).
Though we didn’t know about this option prior to travel, Experience Chile (experiencechile.org) appears to have bus routes directly from El Calafate, allegedly direct to Laguna Amarga.
El Calafate: The Lay of the Land
Day 2: Perito Moreno GlacieR
A bus will pick you up bright and early from your hostel for a ~2 hour drive to Los Glaciares National Park. After trekking across the lake for gorgeous panoramic views, you will take a boat to the southern side of the glacier. Keep your ear peeled for what sounds like loud claps of thunder - it’s chunks of ice falling off the glacier! Guides will set you up with crampons and lead you into this other-worldly frontier of blue-white crevasses.
The glacier trek can be COLD and WET! Suggested packing list:
Day pack with water, book, and snacks
Hat, scarf, and waterproof mittens
Waterproof outer shell with at least two layers underneath
Waterproof pants (I even wore leggings under mine)
Thick, high-profile socks
Waterproof hiking boots
Day 3: El Calafate → Torres del Paine
Because today is a long travel day (aka the day of many buses), be sure you have:
Chilean pesos (CLP) for border crossing, bus, and ferry tickets
Border Crossing: 18,000 during high season 1 October to 30 April
10,000 during low season 1 May to 30 September
Bus Tickets: 15,000
Ferry Tickets: 15,000
N.B. - The Always Glaciers bus stops at a small border town where you can exchange your ARS or USD for CLP.
Your passport
Lots of water, books, and snacks
Here’s a general timetable of what this travel day looks like:
5:30 - 12:00: Catch a bus from El Calafate to Puerto Natales. The bus will drop you off at a station, where you can buy bus tickets to Torres Del Paine from any of the various vendors.
14:30 - 16:30: Catch a bus from Puerto Nalates to Laguna Amarga to pay park entrance fee.
16:30 - 17:30: Catch a bus from Laguna Amarga to Pudeto, where the catamarán departs.
18:00 - 18:20: Take the catamarán to Lodge Paine Grande. Use any waiting time at Pudeto to see the nearby waterfall.
In case you want to plan a variation of this (i.e., stay a night in Puerto Natales prior to departing for the park), on the right are copies of the bus and catamarán schedules.
This map of Torres del Paine shows the “W” trek. If you have time, check out the “O” or the “Q” which take longer but allow you to see more of the park.
There are two points on either side of the “W” from which you can start:
Start with the catamarán, which takes you from Pudeto to Paine Grande. End at Las Torres.
Start at Las Torres, and end with the catamarán.
We chose to start with the catamarán to ease into the hiking. The last day was the steepest, longest day of hiking to the base of Las Torres. Some choose to get this tough part over with first - either way will work!
Better weather at Las Torres made our longest trek easier. We believe the temperature differentials at Glaciar Grey caused a lot of the crazy winds we experienced at the beginning of the trek.
Before you go, book your lodging. During high season, rangers on the trek will request to see receipts of your reservations (even just for free campsites) - so don’t show up without a plan!
The numbers on the adjacent map demarcate where we camped each night. You can reserve a campsite or a bed in a refugio from the two following providers:
2. Fantastico Sur: Francés*, Cuernos, Las Torres, & Chileno
For any of the free campsite (non serviced), you can book directly from the park by e-mailing Conaf.
Because we camped next to the refugios each night, we were able to enjoy a glass of wine and even an occasional hot meal at the end of a long day of hiking. We carried all our own camping gear, but you can rent camping gear at each of the “serviced” campsites if you prefer to lighten your load.
*Though not pictured on this map, Francés is located between campsites Italiano and Cuernos.
The “W” Route: What to pack?
It gets COLD and WINDY in Torres del Paine, so keep a set of clothes dry for the nighttime to stay warm. We left some “city clothes” at our hostel in El Calafate to pick up after the trek - for free! Below is what I brought in my pack to Torres del Paine:
1 big backpack with raincover (63L Gregory)
1 small day pack
1 water bladder (3L Platypus)
1 waterproof hiking pant (wore over my leggings most days)
2 wicking leggings
2 ribbed tanks
2 wicking half zips
1 super warm, lightweight jacket (pictured)
1 lightweight rain jacket/windbreaker
3 pairs of high profile hiking socks
1 pair of waterproof gloves
1 fleece neckwarmer
1 beanie
1 pair of waterproof hiking boots (Danner Mountain 600)
Sunglasses
Trekking poles (helps your knees downhill)
Undergarments
Toiletries
Headlamp
Snacks, food, cooking supplies (unless you plan to buy dinners at the refugios)
Sleeping bag (rating for 32 deg F recommended)
Sleeping pad (I forgot mine at home!!! Had to buy a terrible substitute in El Calafate.)
Tent
Day 4: Paine Grande → Glaciar Grey
[11 KM]
Follow a path that goes uphill and passes several lakes for approximately 2 hours until you reach the beautiful Lago Grey “mirador” or “lookout” - the first glimpse of Glaciar Grey. From this mirador, you still have about another hour to Refugio Grey. Since the whole trek only takes around 3-4 hours, you’ll arrive in the afternoon with plenty of time for relaxing before dinner. If you want to do some more exploring, venture down to the beach behind camp and touch the icebergs. We also highly recommend grabbing a chocolate bar and coming back to the beach after dinner for some dessert and sunset. (Sunset was late - around 21:00 when we visited.)
Day 5: Glaciar Grey → Paine Grande
[19 KM]
Get up early, leave your stuff at the camp, and take a day pack to hike up to Paso. After about an hour, you’ll cross two suspension bridges and reach a former campsite (“no camping” signs) with a lookout nearby. Enjoy the view and decide if you want to continue a bit more in the direction of Paso or turn back. Pro: more trekking will provide you with great views of the massive southern icefield. Con: it’s uphill and adds more mileage to your trek (on top of the 19 km).
Return to Refugio Grey, pack your stuff, and head back down (3-4 hours) to Paine Grande where you will spend the night. Make sure to find a place next to the hill (or even literally in between two bushes like we did!) to avoid the massive winds down there.
Day 6: Paine Grande → Los Cuernos
[28 KM]
Today is a long and tough day, so get up early and hike the ~2 hours to Campamento Italiano. Leave your big pack at Italiano and head to Mirador Francés with your day pack. After about 2.5 hours, you’ll reach the Mirador and have lunch. Pray for good weather because Valle de Francés was socked in and so windy they closed the last mile of the path when we visited. Go back down to Italiano, grab your big pack, and keep going ~2 more hours to Los Cuernos.
Day 7: Los Cuernos → Las Torres
[36 KM]*
Start early - this is the long haul. The hike starts flat and goes up at the end to the base of the Torres. After ~3.5 hours along Lago Nordernskjöld, you’ll reach the shortcut to Chileno (can’t miss - there’s a big sign saying “shortcut to Chileno”). Since we were camping at Las Torres, we did NOT take the shortcut. (Our friends were staying at Chileno, so they took the shortcut and only made it to Chileno a few minutes before we did.) We headed ~30 minutes down to the bridge that takes you off the “W” and towards Las Torres, where ditched our big packs in some bushes to pick back up later on our way down to the campsite. From the bridge, it will take another 2 hours to reach the Refugio Chileno, where you can rest before heading uphill to Las Torres.
The trek to Las Torres is only a slight uphill for the first hour then gets tough: you will encounter a 45-minute version of nature’s stair-climber to reach the summit. You can fill up your water bladder with the glacial melt - we did this the entire trek with no problems!
Enjoy the view then make the long (~3 hour) trek downhill to set up camp at Las Torres.
*If you stay at Chileno or the free Campamento Torres, you can break this up into two days: ~20 km + ~16 km. Pro: you can wake up early and watch the sunrise over the Torres. Con: you have to lug your heavy pack uphill to one of those sites.
Day 8: Torres Del Paine → Puerto Natales or El Calafate
[0-7.5 KM]
Decide if you want to walk [7.5 KM] or take a bus from Las Torres campsite to Laguna Amarga. We were straight out of cash so had to walk (kind of nice to stretch our legs). We also had to spend the night in Puerto Natales because we had to get cash out before taking a bus back to El Calafate and then El Chaltén. If you plan ahead and have cash, you can take a 16:30 bus directly from Laguna Amarga to El Calafate from the vendors we mentioned earlier. You’re not missing anything if you miss Puerto Natales, and getting to El Calafate today allows you to spend more time in El Chaltén the following day. Wherever you end up, grab some beer, do your laundry, and RELAX! You’ve just trekked the W!
Day 9: Puerto Natales or El Calafate → El Chaltén
Buses depart from the bus terminal in downtown El Calafate through three vendors at the following times to El Chaltén:
TAQSA: 7:30, 16:30 [ARS $450]
CalTur: 8:00, 13:00, 18:30 [ARS $600]
Chaltén Travel: 8:00, 13:00, 18:00 [ARS $600]
The ride will take ~3 hours. Once you arrive in El Chaltén, you will have some time to explore. The best part about this town is that you can walk directly from town to all the day hiking trailheads. No more buses!
If there’s still daylight and you’re feeling up to it, do some of the easy day hikes we mention next. We recommend Prana Bar Naturel for dinner. Aris is typically not a big fan of vegetables, but even he loved this vegan fare.
Where to stay? We spent our nights at Rancho Grande - a large hostel with a 24-hour restaurant. There are plenty of other hostels in town, but Rancho Grande is one the oldest and largest. It was pretty OK - nothing amazing but met our needs.
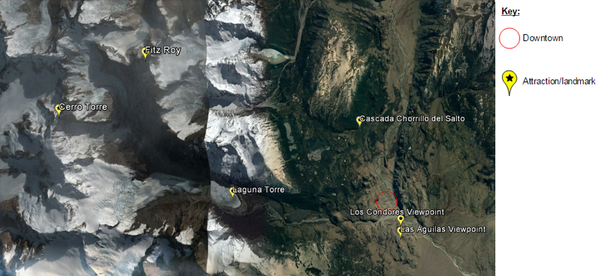
El Chaltén: The Lay of the Land
Day 10: Easy Day Hikes in El Chaltén
[3 KM]
Head up to the Los Cóndores and Las Águilas viewpoints for a steep but easy ~1 hour hike.
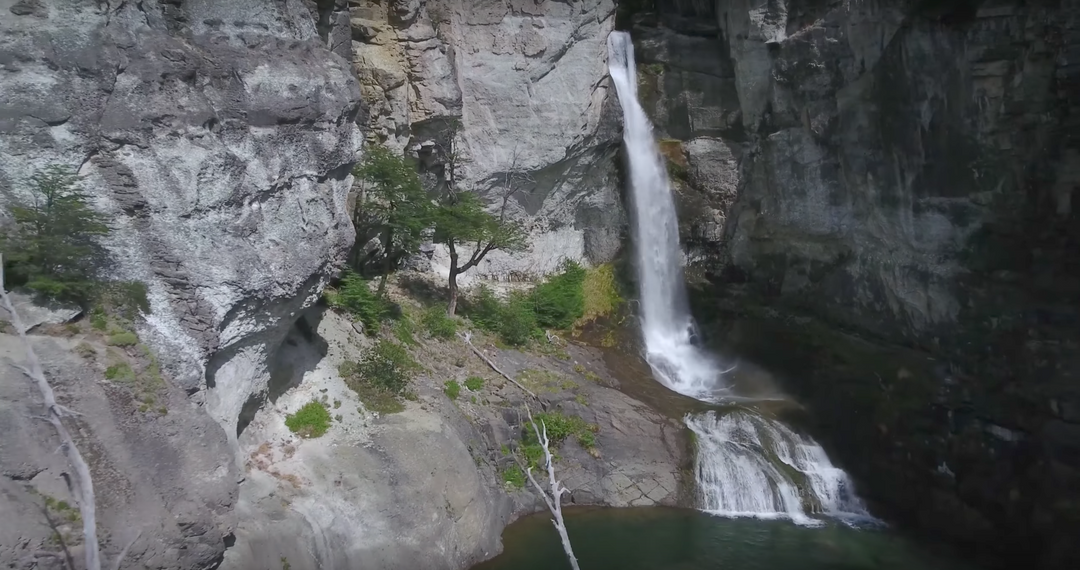
[6 KM]
Head north up the road to Cascada Chorrillo del Salto for an easy, flat trek that ends at waterfall.
End your day at La Cerveceria for their homebrew and free (yet amazing) pre-meal popcorn. I fell in love with Argentina’s version of “stuffed pumpkin” - it’s actually a stuffed butternut squash with tons of veggies and cheese. NOM.
Day 11: Hike Fitz Roy
[22 KM]
Also known as the hike to Laguna de Los Tres (referring to the peaks of Cerro, Fitz Roy, Poincenot and Torre), this 7 to 9 hour route provides the best viewpoint in the national park. It’s a gradual uphill with a stop at Laguna Capri midway. The last 1 km push is steep and uphill (arguably more difficult than the last 1 km push to Las Torres in Torres del Paine).
After summiting, return back to town in time for happy hour at La Vineria, where the empanadas can’t be beat.
N.B. - If you have an extra day, we’re really bummed we missed out on the 20 KM Laguna Torre trek and highly recommend you try it!
Day 12: El Chaltén → Buenos Aires
Catch a bus from El Chaltén to El Calafate.
TAQSA: 11:00, 19:30 [ARS $450]
CalTur: 8:00, 13:00, 18:00 [ARS $600]
Chaltén Travel: 7:30, 13:00, 18:00 [ARS $600]
Fly to Buenos Aires.
Where to stay? There are a TON of options in Buenos Aires. We decided to treat ourselves to a real hotel and lucked out with our find: Palo Santo. This luxury boutique hotel located in the Palermo neighborhood is also super GREEN! The hotel has modern green architecture with beautiful vertical gardens, water fountains, and light-filled rooms designed to LEED (Leadership in Energy and Environmental Design) standards
Buenos Aires: Three Must-Dos
There are so many things to do in Buenos Aires; we only barely scratched the surface. But the below three things we loved so much we consider them “must-dos”:
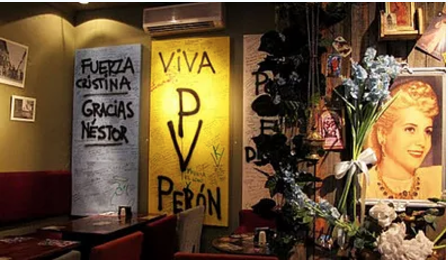
1. Eat: Peron Peron
The food, drinks, and rich culture here are well worth the service charge they tack on to each bill.
The guardian summarizes its essence best: “A space for peronista youths to discuss politics over the pastel de papas (shepherd’s pie, the general’s favourite dish), locro bean stew and malbec served in penguin jugs, this casual establishment is equally popular with kirchneristas, adherents of the strand of Peronism created by the late Néstor Kirchner and his wife, outgoing president Cristina Fernández de Kirchner.”
2. Drink: Floreria Atlantico
This speakeasy looks like a flower shop on the first floor, but when the hostess opens the refrigerator door to the downstairs, you’ll find the best bar I’ve ever experienced (these people agree). Drinks are themed after Buenos Aires’s famous immigrant influences, such as the spritzy rose gin drink dedicated to Antoine de Saint-Exupéry that I thoroughly enjoyed.
3. Explore: Graffitimundo
Graffitimundo is a non-profit organization that supports the urban art scene of Buenos Aires. Developed in close collaboration with local artists, their guided tours reveal the city’s fiery political origins in a modern context. There are several tour options to choose from, and booking in advance is highly recommended here.